In recent weeks, many events came together that drove home something we’ve known for awhile: as genealogists we are not equipped to keep the family records we’ve collected safe enough, and we need to get them in the hands of those who can as quickly as possible. We can’t keep the treasures we’ve saved if we want to save them.
The thought first struck as Hurricane Florence slammed ashore a few weeks ago, and we wondered how many family history collections throughout North Carolina were about to be lost to history under feet of flood waters. And not just the collections like ours, but the little scraps of paper sitting in grandma’s drawers that would have given some future researchers a priceless insight into the lives of their ancestors. Probably 10’s of thousands of priceless documents (at least) were lost never to be documented, never to be appreciated or protected. Then Hurricane Michael hit and wiped out Mexico City, FL and laid a swath of destruction into Southern Alabama…and likely another round of loss of collections that would have added to the mosaic of our research.
Most of the plate glass negatives in the collection that we recently saved were eventually just thrown into a dumpster. We have about 25% of what was saved over the 48 years the studio was in business, but the other 75% was just thrown away.
But what finally brought it home to us, and stunned us so deeply that we had to take a few weeks off before writing this, was that most of the plate glass negatives in the collection that we recently saved (link) were eventually just thrown into a dumpster. We have about 25% of what was saved over the 48 years the studio was in business, but the other 75% was just thrown away. The person that we were able to buy these crates of slides from recounted that they had finished picking in the house that held the studio when they heard glass shattering from the cleaning crew throwing two crates into the dumpster. They realized the plates might be valuable, and asked if they could buy the remaining crates. The person in charge of the estate agreed, and our patron hauled 6 of the crates (at about 90 lbs. per 2’x2′ crate) before they realized they couldn’t carry more, or get them home, and so they left the rest there. The house was confirmed empty by the end of that day…nothing was left.
It didn’t have to be that way. The daughter of the studio owner the studio was approached by a local noted historian and collector over 20 years ago, after obtaining one of the crates and 1000’s of the studio images, and did everything he could to convince her to let him keep her collection safe. But, as someone who didn’t have the ability to let go of objects, she couldn’t part with them. Her house grew full of useless objects over the decades, and grew full of pets who made the house nearly unlivable, so that when she passed it was nearly impossible for the non-relative who inherited the property to sort through anything, even if they understood the historical value of what was in that basement. Instead of a carefully curated collection being kept safe and secure decades earlier, it was shattered in the bottom of a dumpster before it was dumped in a landfill.
Andrew and Anderson Thornton, twins, c. 1914.
From a 1910 dinner at the Taft White House
In some ways we are like that daughter of the studio owner. We have spent countless hours recovering and protecting some of the most amazing documents. We’ve found pictures of our African American great grandfather, and his twin brother, from a time and place where people of color wouldn’t normally have their photos taken, as well as another great grandfather’s White House place card from the Inaugural Ball of William Howard Taft. These are historic, priceless items that bring us great joy and pleasure. They remind us of the rush of the find, and the pride of the work we’ve done. But, as hard as it will be, we must get them out of our hands as quickly as possible and into those hands that can protect them forever. We’re only one bad storm, or one mislaid cigarette, away from losing them like so many others have been lost.
Early one Sunday morning in mid-August I woke up and checked my phone, and saw an eBay listing linked to a post on a Racine History Facebook group. The admin of the group was suggesting someone should buy these plates…and 39 minutes after he posted that plea, I checked the auction and it had ended. Someone had clicked the “Buy it Now” and the negatives were gone. It was the beginning of what’s going to be one of the biggest projects I’ve ever tackled.
This work totally diverges from our normal genealogy and family history research, and it’s a first for this blog to be writing about something outside of the journey of building out our son’s family tree…but something about doing this felt urgent. And luckily my wife indulges me when I tilt at windmills.
Tracking down the collection
After seeing the auction closed, I immediately emailed the seller with a polite request to confirm that the item had actually sold, and if there were any other cases that might be available. He replied back later that day that he had sold that case, but he was cleaning out a space for someone and there may be other cases. About a week later he reached out and said that he’d found 4 more cases, and agreed to sell them directly. We met him at a storage locker and I found he had 3 cases of 5″x7″ glass negatives and 1 case of 8″x10″ negatives. The larger plates were in very bad shape, but the 5×7’s were looked largely OK.
3 of the first 4 crates being picked up
The seller was a bit taken aback at the level of interest he’d received on the auction, and wondered why they were so popular. I explained that a collection of this size of these plate negatives was very rare, and that it likely captured an amazing slice of life in Racine…a slice that would be lost if the collection were broken up. We talked about my intention to get the collection together, make sure the plates were archived properly, scanned and shared publicly, and then donated to a museum that could protect them. The seller agreed to forward my contact information to the person who bought the case of slide we saw on eBay.
About two weeks later that original purchaser reached out to me and I learned he had actually purchased 2 cases, and that he’d sell those cases to me…at a small profit. A few days later we picked up those cases, and we found the scope of what we had: 5 cases of 5″x7″ dry plate negatives, most with two images per slide, for a total of about 2000 slides and 3000-3500 images, as well as 1 crate of 8″x10″ negatives, about 200 total images.
Where did these images come from?
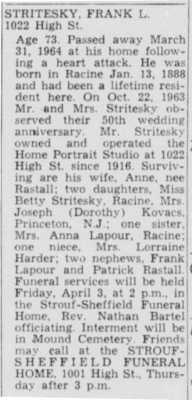
These images were taken by Frank Stritesky who operated the Home Portrait Studio at 1022 High Street in Racine from 1916 through his death in 1964. Frank and his wife Anne were of Bohemian ancestry, and they lived in one of the largest Bohemian neighborhoods in the US, so this collection is likely a great snapshot of that population as well as hopefully showing how the neighborhood changed over the nearly 50 years the studio was in operation.
Frank was survived by two daughters, Betty and Dorothy. Betty never married, and lived with Anne until her death in 1973. Betty continued to live in the house on High Street until her death last year, and it looks like her friend that serves as the administrator of her estate is clearing out the house. The person that originally sold me the plates is a collector, and likely came across this collection as he helped clean out the home or through an Estate Sale. The negatives were probably stored in the basement of the studio, or the garage, which explains the condition issues.
As a side note, after a few posts that I made to the Racine History Facebook group another local historian reached out to me indicating that he had bought a case of plates from the family, before there were condition issues, as well as many prints made from these slides. He felt there could have been around 12,000 images total at the time of Frank’s death, which would mean our collection is only about 25% of what once was.
How are we archiving the negatives?
Our first worry is to get these dry plates stable, and protected, so they don’t continue to deteriorate. We have worked with large, important collections as a part of our family history research (Coming up with a plan to manage my new, huge family history collection) so we had a good idea of how to research the best way to archive these plates. We settled on Hollinger’s Four Flap Negative Enclosures (Four-Flap Document/Pamphlet Envelopes) placed in Dark Gray “Shoe Box” metal edge boxes (Short Lid Negative & Print Storage Boxes), surrounded inside with Ethafoam archival foam to cushion the slides (Artcare Archival Foam White Board). We can fit 70 slides in each box, and given how heavy they are, that works out to about 15 lbs. per box…which is manageable and easy to carry/store. Each box will be stored in a climate/humidity controlled room we have for our collections.
To clean or not to clean
Once I started unboxing the first crate of negatives, it became apparent just how affected by the environment these negatives were. The 5″x7″ were worse than I’d thought, and even the best of them shows a gradation in the photo emulsion that indicates likely water damage. Additionally most have a brown “dirt” on them that often caused the slides to stick together.
I have an extensive background in photography, having processed nearly 20,000 rolls over my lifetime. While my work is entirely on modern, plastic-based negatives, it still gave me confidence that I’d be able to master any needed cleaning techniques. My hope was that I could clean each plate, returning to as close as its original condition as possible. I was able to find an official Kodak publication that details the cleaning process for these exactly types of Kodak dry plate negatives, and it turns out I have most of the chemicals on hand since I still process my own B&W film from time-to-time.
I also reached out to several area museums and archivists in the area, and found white papers from archivists on how they had cleaned dry plate negatives like ours. The Kodak book was specific to removing what’s called “silvering” which is when the silver in the emulsion essentially tarnishes, which isn’t a huge issue with these negatives. It’s present in these negatives, but it’s not impacting. So then we decided to focus on the MUCH easier process of gently cleaning the dirt off the emulsion side of the slides, rinsing them in water, and drying them. The process is detailed by a former City of Toronto archivist (Cleaning Glass Negatives by R. Scott James) and we started with the most damaged example we could find, a slide that was barely viewable it was so dirty.
When we cleaned this first negative, we learned the truth: the “dirt” was not dirt, it was what’s left over when the emulsion is damaged. It’s likely what’s left over when water gets between the slides and drys in that state, and what’s left behind after it’s cleaned is just clear glass. The emulsion is totally ruined in those spots, and so cleaning it doesn’t really damage the negative further, it just reveals the damage. Given the risk to many of these plates, and the risk of even washing the emulsion, I decided to avoid cleaning the emulsion altogether.
This slideshow requires JavaScript.
I did decide to wash the glass side of each plate…until I started to clean with the first 5 slides. There was no damage, but there was no impact either. They didn’t look better, and it took a lot of effort to get them completely clean, without streaks. Since even just cleaning the glass carries a risk of breakage, and there’s no real value in cleaning them, we decided to not clean them at all short of brushing them with proper brushes…carefully avoiding any lose parts of the emulsion. Besides, there’s an adage among collectors of old valuables: they can be in original condition once…once you clean them, they can’t be uncleaned.
Scanning them for use
We reviewed the process UWM followed to digitize their 20,000 slide Polonia Collection (Digitizing Milwaukee’s Polonia at UWM Libraries), and it really is the way to best do something like this. However, we’re already spending about $500/crate in archiving supplies, and we don’t feel like spending the money on a Nikon D800 digital camera, so we chose instead of use the flatbed scanner we already own. It’s much slower per image, but we own needed hardware.
We own an Epson V550 flatbed scanner specifically to scan photos and negatives, and while it has great image quality, the negative scan area can only do 1/2 of the image per scan. We’ve created a custom jig to hold each plate as its scanned, and to ensure we capture the right area with each scan.
For the scans themselves we’ve largely adopted the Library of Congress standards for their Civil War Glass Negative collection (Digitizing the Collection). The first two scans are 1200 dpi at 16-bit grayscale, and I combine them in Photoshop and export them at the “Highest Resolution TIFF Images” standard in the LoC document. From there, I import them to Adobe Lightroom and put a loose crop on them (showing essentially the entire plate), straighten them if needed, and with no other digital alterations export them to the LoC’s “Compressed Service Images” standard (1024 pixel on the long edge, 8-bit grayscale, .jpg files). I then attach a proper citation to each image, and upload the images to our Archive site. These images are lo-res enough to take up very little space in our Archive, but sharp enough to see most of the detail in each slide.
The first box of negatives revealed
The first box of the first crate appears to come from 1917-1919. There’s a man in a uniform that was only in-use from late 1917 through mid-1918, and in another a woman is holding a magazine published in October 1919. There is a wedding party in one series of photos, and a good mix of children, family portraits, and individual portraits. Women were often wearing what I would have thought of as Victorian boots, and while smiling would have been very acceptable by this time, many of the adults have more of a scowl than a grin. Especially the men in the family portraits! There are quite a few men in uniform, right around the time of WWI.
We’ve also learned that each crate is going to require 5-6 of the shoe boxes to hold all of the slides, and that the crates weigh about 90 lbs. each!
What’s next?
A LOT of work! This box took about 2 straight days to scan, and another 2-3 days to combine the photos and prepare them for presentation. It then took a day to give them the proper index data in the Archives, so each box represents about a week’s worth of full-time work, so each crate will take about 6 weeks total to process. We are going to avoid giving updates for a bit after this, so we can focus on the scanning/archiving piece of this project…with an eye of getting these negatives processed and safe as quickly as possible.
We are also going to keep looking for any additional crates, to see if we can add to what we have, and we’re going to keep trying to get a copy of the key that links the # on each plate to the person in the photo. In the meantime, if you recognize anyone in these photos please let me know and I’ll update the information.
Finally, it’s time to start discussions with local History Societies and Museums to see who might be able to house this collection permanently. Something like this, something this historic and special, can’t ever be properly safe in my home. It’s also expensive for institutions to house these items, as well as getting them into an archival state…I’m hoping that by doing most of the work for them, and doing it properly, places will be interested enough to take in this collection when the time comes. Starting that conversation early on should help that effort.
Please share, discuss, and help identify the surviving families who might never has seen these images. But most of all, enjoy this special slice of Racine’s history!!
When we inherited our first big set of archives from our family (The find of a lifetime…twice in a weekend) the promise we made was that anything shared with us would be made available to everyone, so the family could finally have access to all of the treasures that we’re entrusted with.
Since that time we’ve properly archived everything we received (10 Gaylord boxes of documents…and counting!), and we’ve received a few more collections. Today, we’ve flipped the switch on our new online archive, which has high-res scans of documents, all of which are categorized with proper metadata and tagged with an “Evidence Explained” quality citation (Archive Collections).
As of today, it’s only 29 of the 1000’s of documents, photos, letters, speeches, etc. we’ve received, but it’s taken almost 2 solid months of planning, learning SharePoint 2013 and things like the Library of Congress Subject Headings and DCMI to get this first run of documents up. Hopefully, subsequent batches are larger and more frequent…but for now here’s a taste of what we’re going to someday share.
Thanks again to everyone how entrusted us with these family treasures!! Also, to all the fellow nerds who want to know how this was all done, expect a detailed post to follow soon!
In my last post (Coming up with a plan to manage my new, huge family history collection) I discussed how we were hopeful we’d find a balance between protecting this amazing find of a life time, and our family life, work, other genealogy, blogging, sleep, etc. That I haven’t posted in a month or so should give you a good indication of how completely we’ve failed at finding anything close to balance!
However, the first of the three boxes we received has now been inventoried and stored archivally, and it’s given us hints of just what an amazing collection this is. By the numbers, we found over 250 photographs, over 175 newspaper clippings related to the family, and over 250 documents ranging from invitations to the Teddy Roosevelt White House and speeches to Congress, to letters home from college and recipes.
Box 1, BeforeBox 1, After
The material has filled 4 Gaylord boxes (actually Hollinger boxes, but everyone just calls all metal-edged boxes Gaylords), a photo sleeve for all pictures 5″x7″ or less, and a 16″x20″ flat photo storage box for the larger pictures. As you can see, we’re still using the cardboard boxes that the 5″x7″ photo sleeves were shipped in to store the photos, but that’s just until the order is placed for the Gaylord “shoe box” to hold them.
Each piece of paper is separated by a sheet of acid-free printer paper, with all staples, paper clips, clasps, etc. removed. Each item was given a number, and inventoried with basic info like date, sender, receiver, # of pages, etc. Once the inventory and archiving of all 3 of these boxes is complete, we’ll go back and scan and catalog each item, and share them out publicly for consumption.
By the numbers, we found over 250 photographs, over 175 newspaper clippings related to the family, and over 250 documents ranging from invitations to the Teddy Roosevelt White House and speeches to Congress, to letters home from college and recipes.
Luckily, it wasn’t all work. About a month ago my cousin Denise, who is working on putting together the Morse family reunion in Oregon in August, asked if we could share photos from this collection for some of the materials. We were able to scan and share more than a dozen pictures that likely haven’t been seen in at least 30 years, as well as several originals that have been circulating through the family as scans of photocopies. It was fun to go through images and piece together which ones were related to the Morse family, and who the subjects in the photos were. It was also very gratifying to share out high quality images of some of these originals that we came to know through copies of old family reunion books, and hoped we’d some how get access to the originals one day.
And, of course, as we were reading through the documents quickly to gather information for the inventory, we came across lots of great information that jumped out at us…even though it was not all flattering.
Sadly there were a lot of dated references to “darkies” and the like as my Great Grandparents wrote home about their first trips to Washington, DC during his first term in Congress. Additionally, my Great Grandfather gave a speech talking about First Nation issues in the early 1900’s that really captured some of the most accurate and honest understanding of how we as a country unfairly destroyed these nations, but in the same speech he both calls for the cultural genocide of these First Nation bands that had survived, and contrasted their strong, positive culture with the “lazy” negroes.
There also was a lot of very personal and touching moments like when my Great Great Grandmother wrote her daughter on Christmas Eve about how lonely she was and how she wished that all of her children could be under the same roof again “singing college songs”.
We also got to follow my Grandmother Catherine’s path through college (she wrote home 2x a week for 4 years, and her mother saved every letter), from how she was dating many boys, to
My Grandmother Catherine (Morse) Leonard’s senior portrait (college), 1932
how she got in trouble for drawing in the school hymnals and had to pay an $8 fine…which she found very unfair. We are lucky enough to have her father’s response to that letter, which basically said that she should keep quiet and pay the fine now, and give the Dean both barrels once she’d officially graduated!
It came as a bit of a shock learning that my Grandmother dated both the future Governor of Wisconsin Warren Knowles and Hollywood actor Jack Carson, one of the biggest comedic stars of the “Golden Age of Hollywood”.
So, all-in-all it’s been amazing going through all this work, but it most certainly been work. One of our DNA tests came back late last week, and so we spent the weekend working on the Tradewell brick wall we talked about a few months ago, with a little progress, so we’re trying to get back to enjoying all parts of this hobby. But this is a pretty major undertaking!
As I wrote about in my last post (The find of a lifetime…twice in a weekend), I was pretty freaked out about the impact of receiving the largest collection of family history items I’m likely to ever receive. By the next day it was clear that someone else had claimed the photo albums that were found in Oregon, so it was just this huge collection that I had to process.
What I was feeling those first few days was basically a powerlessness that soon disappeared once I realized we can manage this if we just took a deep breath and put together a plan.
Luckily I had a few bourbons, relaxed, and we came up with a plan. That helped get us back to appreciating this blessing we’ve received, instead of focusing on anything negative.
Before we get to that however, here’s a quick update on the collection. The first thing that jumped out at me is that this isn’t a single collection; this is the remnants of my Great Grandmother’s, my Great Grandfather’s, my Grandmother’s, and my Uncle’s collections. The first boxes came from my grandmother’s cottage after her passing, and there are many documents from/to/regarding her, however there is a trove of correspondence and photos and documents from her parents. In-fact, there are even some that are from her grandparents! Each generation likely collected what they could from the previous generation, and it eventually grew into the collection that’s on my dining room table. What I’m finding most interesting is the letters that reference events, and then finding the invitations to those events in other parts of the collection. Also, the few letters where I’ve found both sides of the conversation for a letter or two are fascinating. Most excitingly I’ve found many photos of relatives that we’ve had no previous photos!
Here’s how I calmed down, and started attacking the collection, and the impact on my life outside of this hobby.
Research how to archive a collection
My first thought was that I would catalog, inventory, scan, present, and cite each item in the collection, touching them once before putting them into their final archival state. But how should I properly archive them?
I Googled it (of course!), and pretty quickly came saw there was a pretty common approach to these collections. The New England Historic Genealogy Society has a great video walking through the common wisdom on how to archive items (Organizing and Preserving Your Family Papers), and it wasn’t long before I had come up with a strategy. I also visited my local History Museum and met with a very helpful historian there to review some of my questions, and found I was largely on the right track.
Split tasks, focusing on organizing and protecting the collection first
It became clear that we can’t spend the year moving these boxes back and forth from kitchen counters, to the dining room table, to the couch (if the 18-month old is restrained), as we live our lives. It was also obvious that keeping everything in the plastic tubs they came in for months was going to be a good medium-term strategy.
Buy 1000 nitrile gloves, you’re going to need them all! You can also see our inventory log in the background.
We made the choice to focus on collecting an inventory as we move each piece into archival storage first, and when that’s complete (and the collection is organized/protected), we’ll go back and catalog, scan, present, and cite each piece. It does mean touching everything twice, but it also gets the collection protected and in proper storage much quicker.
Make choices on archival strategies, and purchase supplies
One of the things that is immediately apparent about archiving this collection is that nothing is cheap. That inevitably will make us make choices about how to protect items, balancing their long-term survival with the costs of providing maximum protection.
Since we have a nice space that’s largely temperature and humidity controlled, and away from exterior walls/plumbing, the main risk to this collection is the acidity of the papers that makes it up. The best way to protect the paper would be to separate each piece in a sleeve made of polyester, polypropylene or polyethylene (3P’s), but in a collection of what will likely be at least 1000 pages of various sizes, it would be very, very expensive. However, as long as you choose carefully, many copy papers are acid-free and you can separate your documents using these papers, and stop the acid transference between pages that will eventually destroy the documents. The downside to using paper, instead of a 3P sleeve, is that the paper will need to be replaced every 3-5 years since it will become acidic as the historical documents transfer their acids to the acid-free paper over time.
Get the newsprint away from everything else
The most acidic paper in any collection is newsprint, and it’s doing the most damage to the collection, so it’s best to start by getting it out of everything. There were close to 200 newspaper clippings related to my great grandfather’s time in Congress in Box 1 alone, so we pulled them all out and put them in their own folders. The experts are divided on what to do with newsprint, but many archivists suggest making copies of what’s of interest (on acid-free paper), and destroying the originals. We’re taking a little different approach, in that we scanned everything into raw image files, and then put the original clippings in their own folders in their own archival box. Eventually we’ll put a 3P sleeve around the entire batch of clippings, so that the acids won’t leach out of the newsprint, but it will continue to subject the clippings themselves to acid. This will eventually lead to the loss of the documents, but they have largely survived for over 100 years, and so with good digital copies, and limited archiving, we should be able to provide some preservation without going through the huge expense of trying to protect each piece.
We assigned a document # to each clipping, and inventoried them as they were scanned and stored, so we have at least basic information about each.
Separate the documents from the photos, inventory, and store the documents
We decided to attack the documents first, and for them we’re going to categorize them by type (Personal correspondence, Speeches, Misc. documents, etc.), separate each page with acid-free copy paper, inventory the document with basic information (description, date, author, target, etc.) and a document #, and store them. The documents are going into 5″ deep, legal-sized metal-edged archival boxes and legal-sized folders. I already had archival folders, and some of the boxes, so adding more to store the collection makes sense. We are making sure that each sheet is smaller than the copy paper dividing them, so we’ve bought letter, legal, and ledger sized paper.
Metal-edged storage boxes: Hollinger Light-gray, legal-sized metal-edged document case, with lid (part #10360AB)
Sleeve each photo in a PAT-tested envelope
How best to store the photos has been a bit of a dilemma. In the past we’ve used 3P 3-ring binder pages of 4″x6″ and 5″x7″ pockets, and stored them archival binders. However, faced with hundreds of photos of various sizes, it’s taken some work to decide how to archive these pictures.
We don’t have a complete strategy, but since most of the photos are 5″x7″ or less, we started there. We’ve ordered individual 5″x7″ envelopes with PAT-tested clear windows on the front. While some archivists suggest writing information on the backs of photos using either pencil or an archival-quality marker, there’s another school of thought that suggests to use envelopes for photos and to write information on the envelopes. Given the more dense storage of envelopes and storage boxes vs. 3-ring binders, and that we’re more comfortable not writing on original photos, we’ve gone the envelope route. We will likely go with larger envelopes for the larger photos, and a large metal-edged box for them, but we haven’t decided yet. It’s been harder to find a large enough 5″x7″ storage box to hold all the photos than we would have guessed, but ultimately we’re trying the box made for the archival storage of shoes from Gaylord since it will give us 13″ of photos.
Again, once we focus on photos we’ll be doing it two phases: first, inventory, assign a photo #, and store them archivally. Once the collection is completely protected, we will come back and scan them, catalog and identify them, and then cite/publish them.
Here’s the products we’re using for photos (so far):
Box 1 is only photos and documents, so we’ve only addressed how to approach those item. Boxes 2 and 3 are much more book and relic focused, so we’ll figure out how best to archive those items as we get to them.
Balancing time going forward
One of the main worries we had when the collection arrived home was how we will do any other work now that there is years of work in front of us. It took a couple of days, but the solution was pretty simple: manage the time we have, and live within our means. We’ve decided that Monday and Wednesday nights are genealogy nights, Tuesday and Thursday are family history-free, and we play the weekends by ear. I’ll get up early on the weekends and get a few hours of document work in while everyone else sleeps (I’m used to getting up at 5:30a anyways), and the college-aged boys home from school have been pitching in.
We’re working on the balance of family history projects still, and you see it in this blog. Instead of posting 2-3 times a week, it’s been barely 1 time a week since we received the collection. Additionally, the great document I’ve been working on to better understand how a formal Research Plan can breakdown brick walls (Elizabeth Shown Mills has just the right guidance at just the right time!) hasn’t been opened in two weeks. We’re forcing ourselves to put down the collection and focus a bit on DNA, and a bit on Felice’s lines, but we’re going to have to get much better at this as time goes on.
But the important part, for both the time division as well as the overall archiving of the project is this: there is a solution, and we just have to focus on finding the right tools, the right strategies, and the right balance. What I was feeling those first few days was basically a powerlessness that soon disappeared once I realized we can manage this if we just took a deep breath and put together a plan.
More to come on this amazing collection!
Menu
Cookie Consent
We use cookies to improve your experience on our site. By using our site, you consent to cookies.
Cookie Preferences
Manage your cookie preferences below:
Essential cookies enable basic functions and are necessary for the proper function of the website.
Name
Description
Duration
Cookie Preferences
This cookie is used to store the user's cookie consent preferences.
30 days
These cookies are needed for adding comments on this website.
Name
Description
Duration
comment_author_url
Used to track the user across multiple sessions.
Session
comment_author
Used to track the user across multiple sessions.
Session
comment_author_email
Used to track the user across multiple sessions.
Session
Statistics cookies collect information anonymously. This information helps us understand how visitors use our website.
Google Analytics is a powerful tool that tracks and analyzes website traffic for informed marketing decisions.
Contains custom information set by the web developer via the _setCustomVar method in Google Analytics. This cookie is updated every time new data is sent to the Google Analytics server.
2 years after last activity
__utmx
Used to determine whether a user is included in an A / B or Multivariate test.
18 months
_ga
ID used to identify users
2 years
_gali
Used by Google Analytics to determine which links on a page are being clicked
30 seconds
_ga_
ID used to identify users
2 years
_gid
ID used to identify users for 24 hours after last activity
24 hours
_gat
Used to monitor number of Google Analytics server requests when using Google Tag Manager
1 minute
__utmb
Used to distinguish new sessions and visits. This cookie is set when the GA.js javascript library is loaded and there is no existing __utmb cookie. The cookie is updated every time data is sent to the Google Analytics server.
30 minutes after last activity
__utmc
Used only with old Urchin versions of Google Analytics and not with GA.js. Was used to distinguish between new sessions and visits at the end of a session.
End of session (browser)
__utmz
Contains information about the traffic source or campaign that directed user to the website. The cookie is set when the GA.js javascript is loaded and updated when data is sent to the Google Anaytics server
6 months after last activity
_gac_
Contains information related to marketing campaigns of the user. These are shared with Google AdWords / Google Ads when the Google Ads and Google Analytics accounts are linked together.
90 days
__utma
ID used to identify users and sessions
2 years after last activity
__utmt
Used to monitor number of Google Analytics server requests


 These images were taken by Frank Stritesky who operated the Home Portrait Studio at 1022 High Street in Racine from 1916 through his death in 1964. Frank and his wife Anne were of Bohemian ancestry, and they lived in one of the largest Bohemian neighborhoods in the US, so this collection is likely a great snapshot of that population as well as hopefully showing how the neighborhood changed over the nearly 50 years the studio was in operation.
 what’s left over when the emulsion is damaged. It’s likely what’s left over when water gets between the slides and drys in that state, and what’s left behind after it’s cleaned is just clear glass. The emulsion is totally ruined in those spots, and so cleaning it doesn’t really damage the negative further, it just reveals the damage. Given the risk to many of these plates, and the risk of even washing the emulsion, I decided to avoid cleaning the emulsion altogether.
 The first box of the first crate appears to come from 1917-1919. There’s a man in a uniform that was only in-use from late 1917 through mid-1918, and in another a woman is holding a magazine published in October 1919. There is a wedding party in one series of photos, and a good mix of children, family portraits, and individual portraits. Women were often wearing what I would have thought of as Victorian boots, and while smiling would have been very acceptable by this time, many of the adults have more of a scowl than a grin. Especially the men in the family portraits! There are quite a few men in uniform, right around the time of WWI.


 Luckily I had a few bourbons, relaxed, and we came up with a plan. That helped get us back to appreciating this blessing we’ve received, instead of focusing on anything negative.
 We decided to attack the documents first, and for them we’re going to categorize them by type (Personal correspondence, Speeches, Misc. documents, etc.), separate each page with acid-free copy paper, inventory the document with basic information (description, date, author, target, etc.) and a document #, and store them. The documents are going into 5″ deep, legal-sized metal-edged archival boxes and legal-sized folders. I already had archival folders, and some of the boxes, so adding more to store the collection makes sense. We are making sure that each sheet is smaller than the copy paper dividing them, so we’ve bought letter, legal, and ledger sized paper.